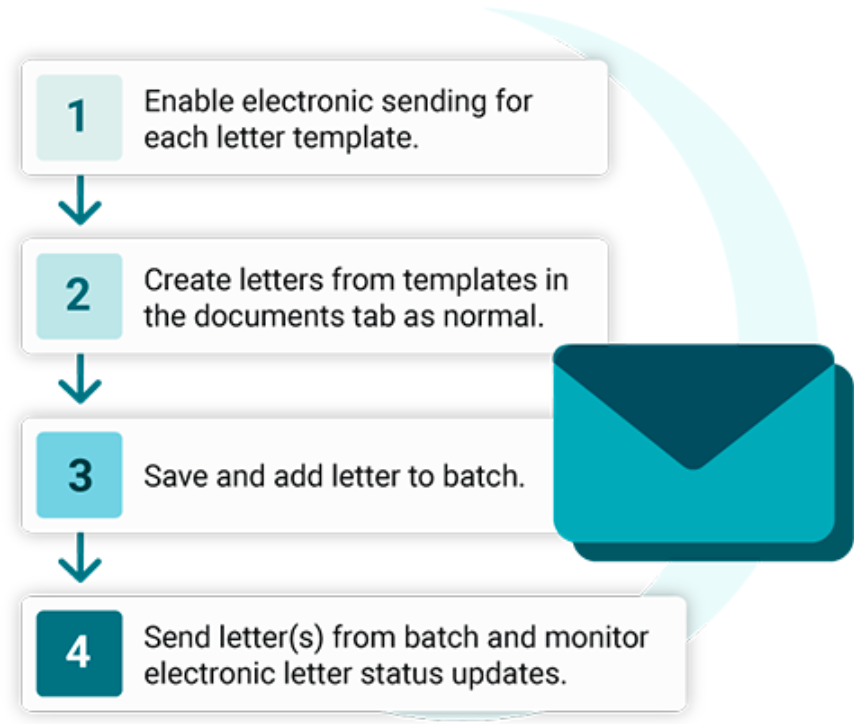
Electronic Letter superuser set up
The first step is to enable your letter templates for electronic sending within the Letters section of the superuser menu. This setting only needs to be enabled once at template level and will then apply to all letters created using that template.
Step 1
Click on Letters in the Superuser menu.

Step 2
Under Letter Template Editor, select the relevant Category and Template.

Step 3
At the bottom of the page, Select the option labelled “Electronic Letter”.

Click on either Save to update the current template or Save New to create a new template with this setting.
You may wish to rename the template to make it clear that it has Electronic sending enabled, for example ‘Assessment Booked Letter – Electronic’.

Enabling electronic letter sending for a patient
There are a number of things that must exist on a patient record for them to receive Electronic Letters. These are:
- A valid mobile number
- Consent to receive SMS
- A Date of Birth
- A Surname
These allow the patient to receive the letter, and input their details on the authentication screen to access the letter.
Communication Preferences
Within the Registration tab you can select the patients preferred method of contact. You can also select options for Postal Letters (manually printed or sent via Hybrid Mail, if you would like more information on this feature, please raise a support log within iaptus) and Electronic Letters.

These will then display in the Letters tab as a visual aid when creating letters to send to a patient. Please note: these do not force the system to only send via their preferred method, they are just a visual aid so you can determine which letter template you select to send.

Using the electronic template
Using an electronic template to create a letter is no different from creating a letter from any other template in iaptus.
Step 1
From the Documents Tab of the Patient Record, choose the letter Category and Template with electronic sending enabled.

You can make any edits to the letter content as normal.
A red warning will appear telling the user that the template they have selected is set up to send electronically.

Step 2
Click on Save and add to Batch.
The letter will appear in the letters list for that patient and within the Batch Letters section with a Batch Letter Print Status of [E] Pending.
Sending electronic letters
Sending the letters electronically from iaptus has been designed to fit within the same workflow as printing and sending hard copy letters in order to ensure the process is as seamless as possible.
Step 1
Go to the Batch Letters tab.
Step 2
Use the checkboxes to tick the letters you wish to send.
Click on ‘Print/ Send Selected’. This will send the letters marked for electronic sending securely to the SMS sending queue.
Any letters created with a letter template not marked for sending electronically will be downloaded to your computer for printing as normal.

Batch letter statuses
The batch letters table includes a number of filters that allow you to easily find and identify letters.
The status drop down allows you to filter by the status of Electronic letters. You’ll also be able to see the status of a letter within the letters section of the patient record.

The statuses are summarised below in two formats: the way they appear in the status dropdown and the batch print status displayed within the table. For example, Sent Electronically – Queued is shown in the dropdown and [E] Queued is shown on the batch letters screen.
- Sent Electronically – Queued/ [E] Queued – The letter SMS has been queued with the provider for sending.
- Sent Electronically – Sent/ [E] Sent – The letter SMS has been passed to the mobile network provider (eg. Vodafone, O2, EE, Three).
- Sent Electronically – Delivered/ [E] Delivered- The letter SMS has been delivered to the patient’s device. This status is returned to us by the network provider.

If a letter is showing an [E] Delivered status but a patient has reported not receiving the letter please double check their mobile phone number and ask them to check their SMS spam section. This should allow the patient to find the letter.
- Sent Electronically – Accessed/ [E] Accessed – This status appears when the patient has clicked the link for their letter, but has not yet gone through the authentication process and viewed the letter.
- Sent Electronically – Viewed/ [E] Viewed – The patient has completed the authentication process and has viewed the letter.
- Sent Electronically – Failed/ [E] Failed The letter has encountered an error in sending. Hovering over [E] Failed will display the failure reason. All Failed letters appear automatically in the Pending section as [E] Failed to ensure that they can be easily seen and dealt with appropriately. Selecting Print on an [E] Failed letter will download this for manual sending, and will change the status to [E] Printed.

For any of the applied filters, a summary report can be downloaded by pressing the “Download all histories as CSV” button.
Tip: you can easily test this flow by using your own mobile phone number on a test patient – This will allow you to see the steps in action.
Accessed & Viewed Status’
The ability to see if a letter has been delivered, accessed or viewed is one of the powerful benefits of this feature. This allows you to tailor your workflows around contacting patients, based on how they interact with the letters you send. The accessed and viewed statuses show the granularity between those patients who have opened the link but have not yet passed through the authentication step, and those who have successfully loaded the letter.
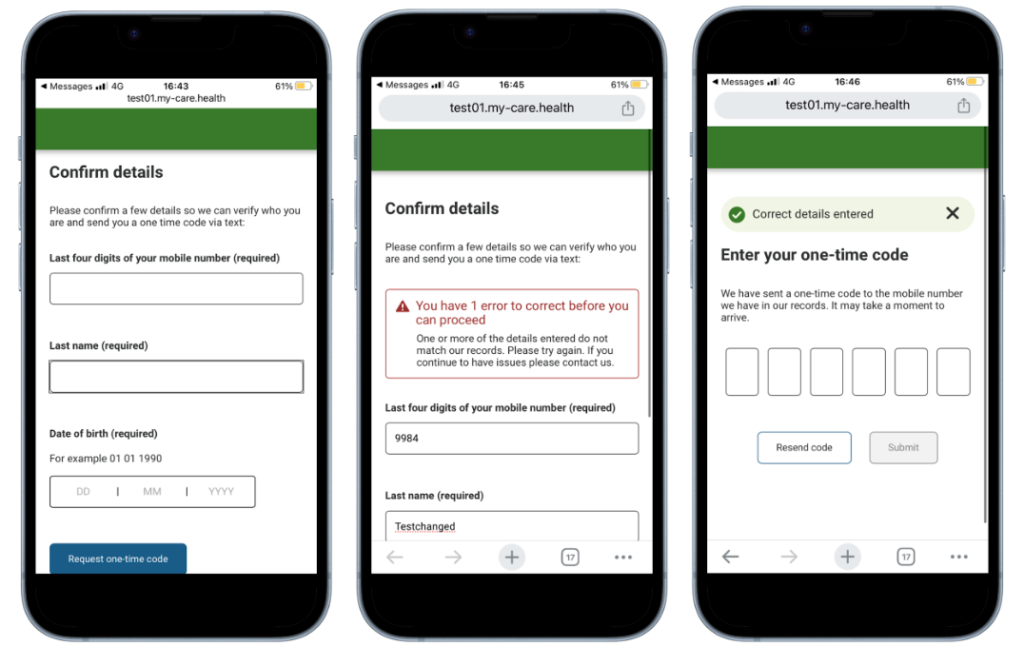
Patient Workflow
When a Letter is sent, the patient will receive this via a link in an SMS. When clicked, the link will open in their browser and they will be presented with a welcome page, this will ask them for their details to access the letter.

Patient Verification
Clicking the continue to log in button will open the portal login screen where they must pass through a verification process using their Phone Number, Date of Birth, and Last name. Any errors will be flagged, as in the below example.
Once the details have been verified the patient will see a success message and be shown a screen to enter a one time code. This code will be sent to the mobile phone number that is registered to the patient in iaptus. This 6 digit code is valid for 15 minutes, and the patient simply enters it into the page. If the patient has not passed this step, but has clicked on the link, then the Status will show in iaptus as [E] Accessed.
Viewing the letter
Once the verification has been completed the patient will then be shown the letter. Once this has happened the status in iaptus will show [E] Viewed. From here the patient can choose to download the letter to their device using the “Download as PDF” button should they wish to.
If they wish to return to the letter later, they can simply return to the portal using the original link. This allows the patient the flexibility to read the letter at their convenience.
Patients are automatically logged out of the patient portal after 15 minutes of inactivity.

Set-Up Process
If you would like to enquire about this feature please raise a log with your account manager and they will be happy to assist you.