The diary area in the icon menu is one of two diary areas in iaptus, diary search being the other option.
Diary allows users to manage a specific therapist’s availability and view what has been booked into the diary for that therapist
Diary search allows users to see what availability is free in any therapist diary to book a patient appointment

If you are an admin working on behalf of a therapist, you will be able to see the diary for that therapist.

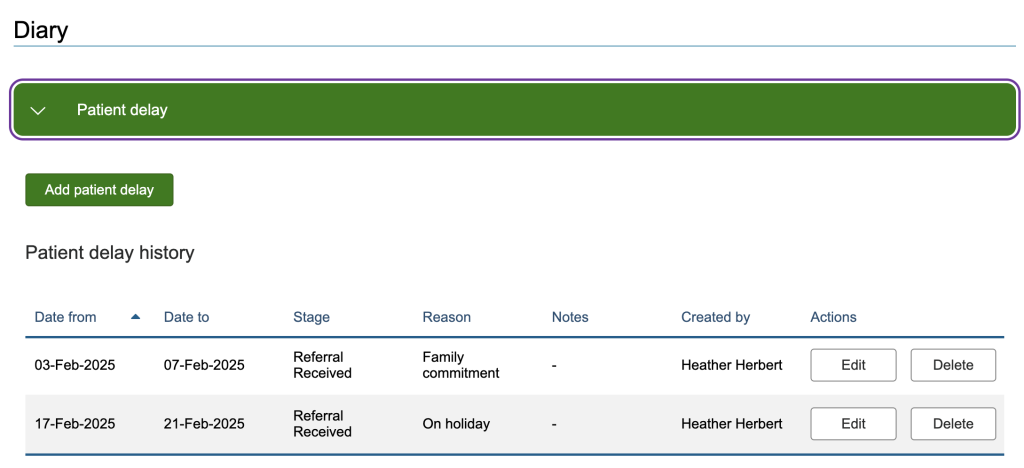
Patient Delay
If the selevted patient has been selected and they have a patient delay in place, then the top of the diary page will show any patient delays recorded.
Understanding the diary
The calendar will default to the current month or week. This can be changed by using the Monthly View, Weekly View and month selector at the top of the diary.
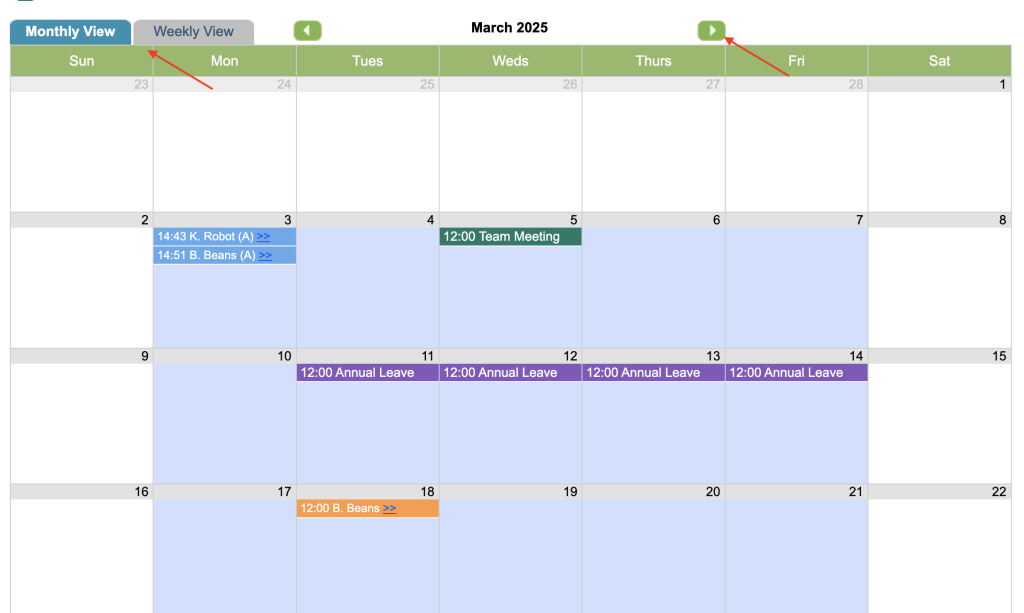
There is a Key at the top to explain the different entries.

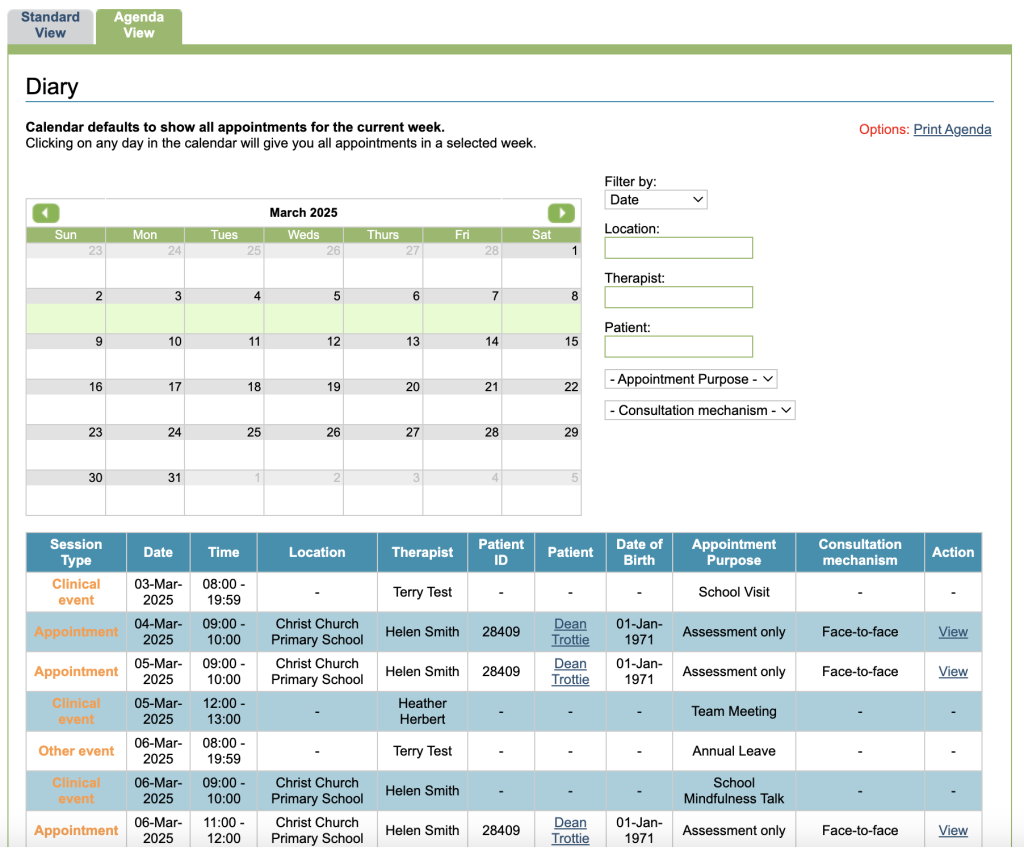
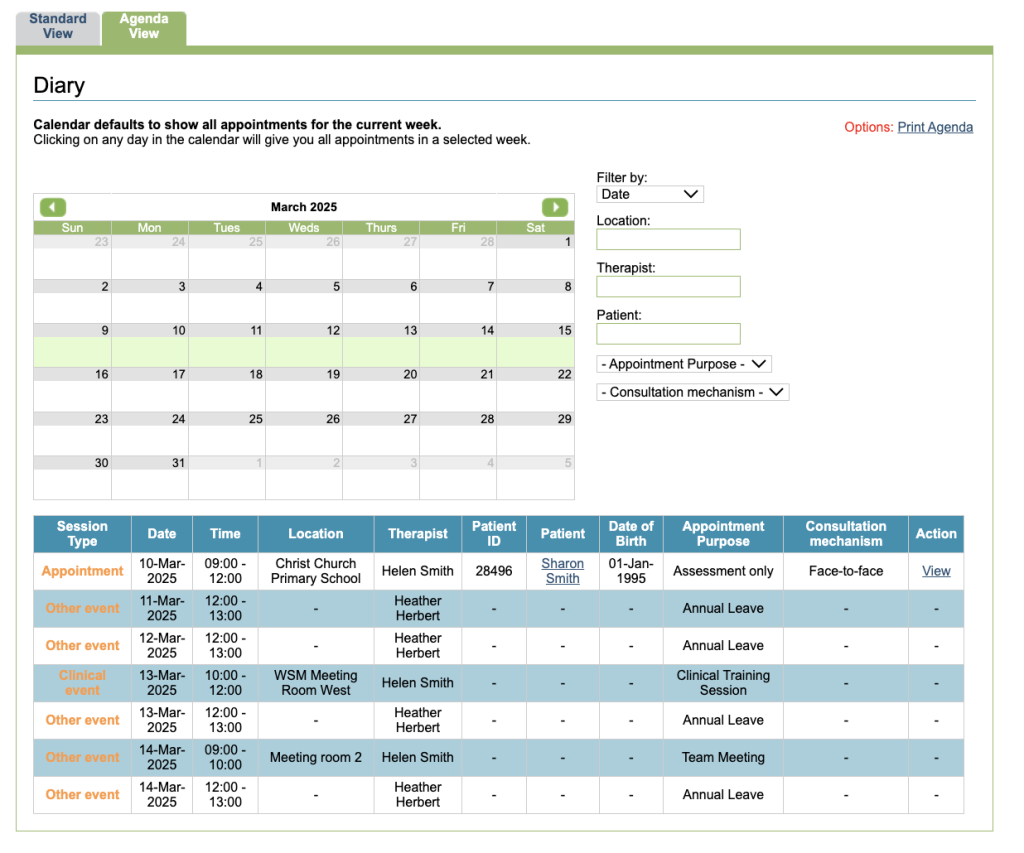
There is also the option to view the diary in the Agenda view. This defaults to show all entries for the current week. Clicking on any day in the calendar will show all appointments in a selected week, displayed in a table underneath the calendar.
You can also use the filter options on the right to view calendar entries by Date, Location, Therapist, Patient, Purpose or Consultation mechanism. There is also an ability to print.
The ability to allow therapists to see the appointments of other therapists in the agenda view can be controlled by superusers in the diary area of the control panel
Adding availability
In iaptus, availability must be scheduled in a therapist’s diary before a patient appointment can be booked.
If availability has not been added for a particular day, the option to add availability will This allows therapists to indicate when they are available, and the types of appointments they want booked during that session, which is especially helpful if admin staff are booking their appointments.
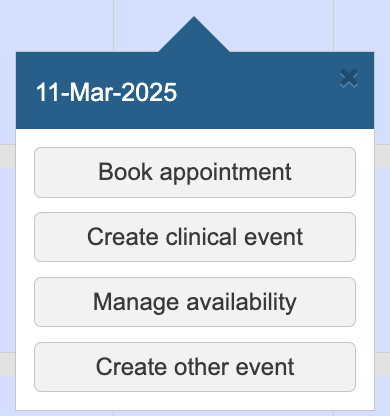
To do so, simply click on the day you wish to add availability for and select the Option to Create availability.
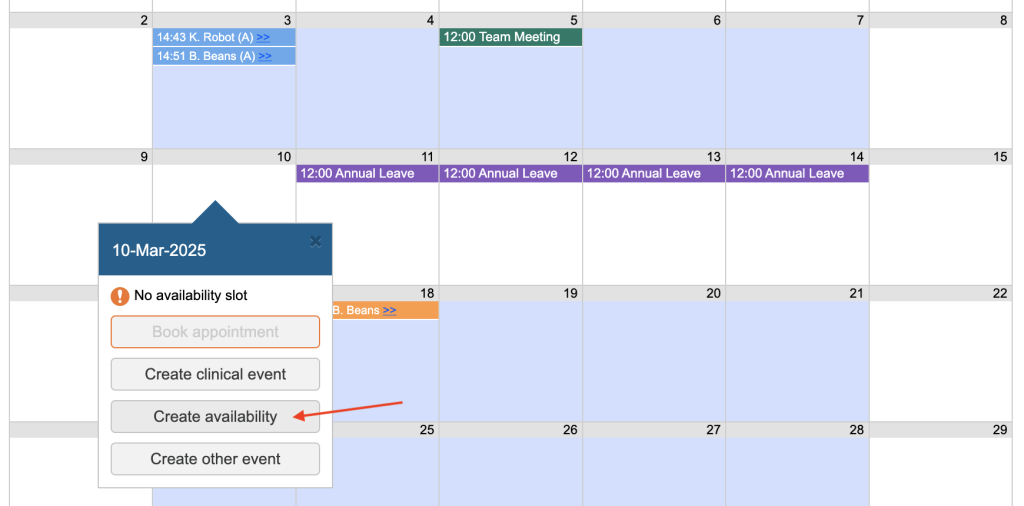
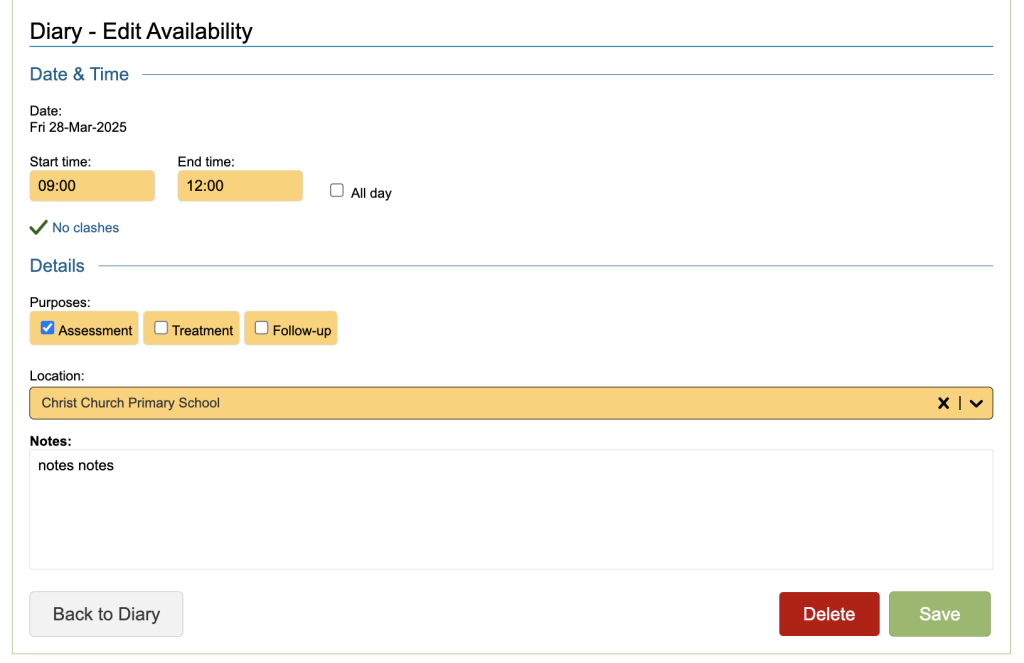
You will be presented with the Create Availability page
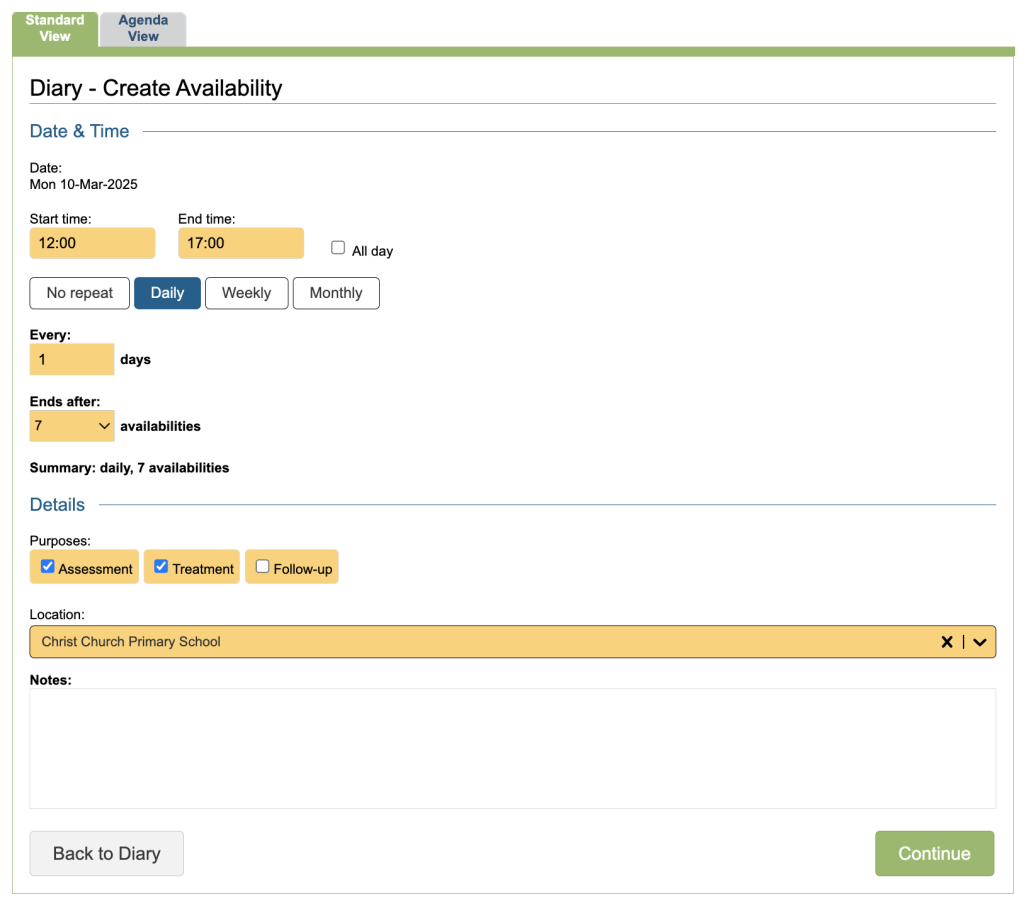
The availability can now be inputted, including the following details:
- The start and end times of that particular slot
- Repetition of the slot over subsequent days/weeks/months
- The availability appointment purpose (i.e. assessment, treatment)
- The location of the appointment
- Any notes about the availability
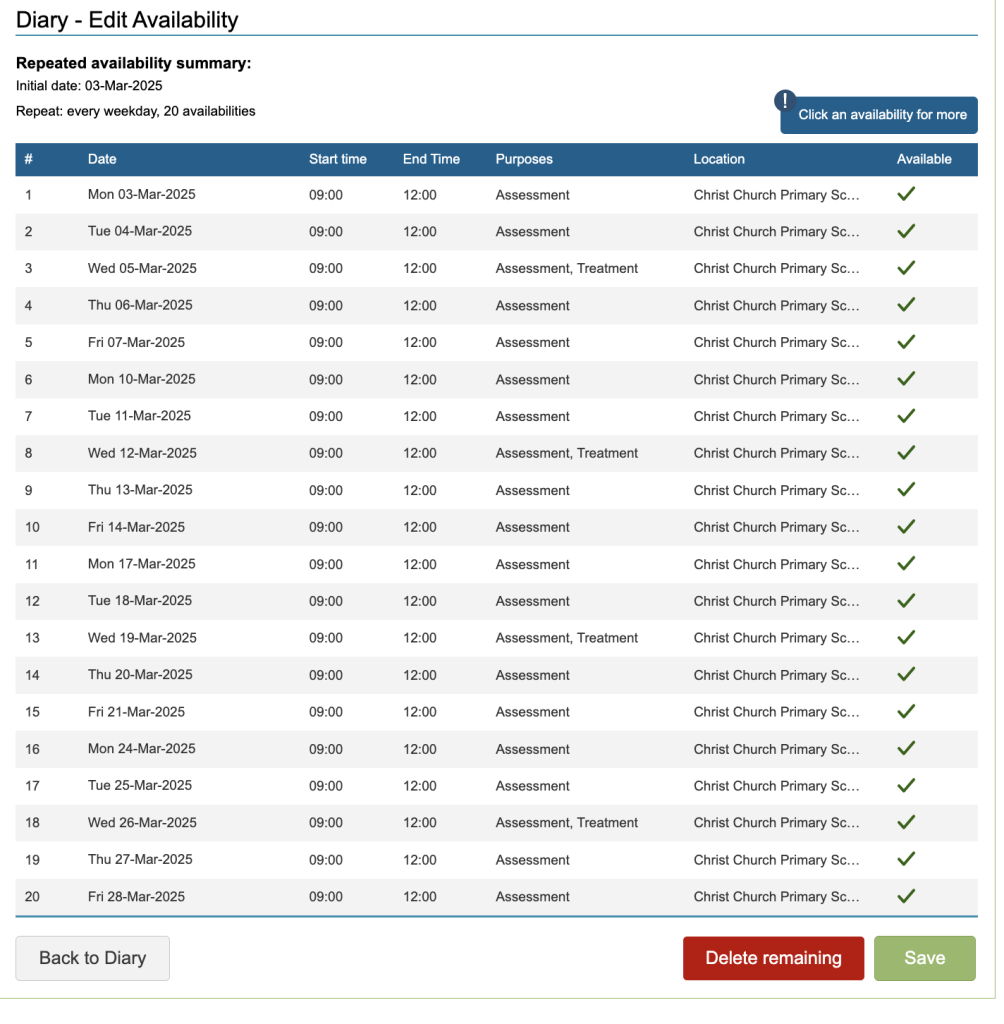
In the example above, the daily option has been selected, you will be presented with a page that allows you to choose how many days to have the availability over, eg the next five days.
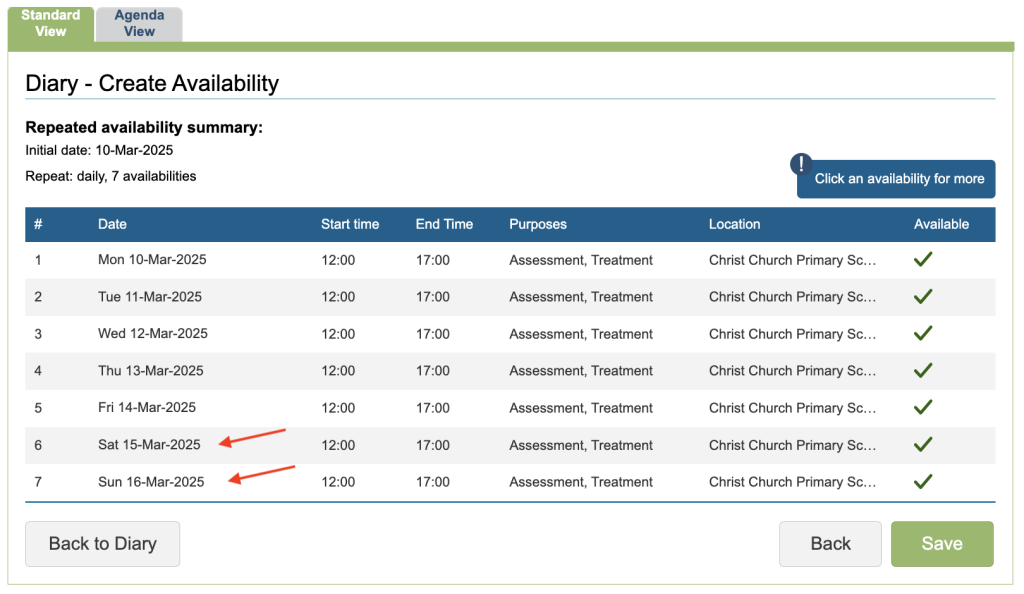
The number of availabilities will then determine how many availability slots are then created, Please be aware that this option does not ignore weekends. So in the example above, availability will be created from Mon 10-Mar-2025 every 1 days for 7 availabilities, including Saturday and Sunday, shown below.
Superuser Settings
Mandatory fields are shown in yellow. Many of these field values can be customised by superusers in the superuser menu including:
- The start time, end time and number of repeats via the control panel diary area
- The location and purpose via the list management area
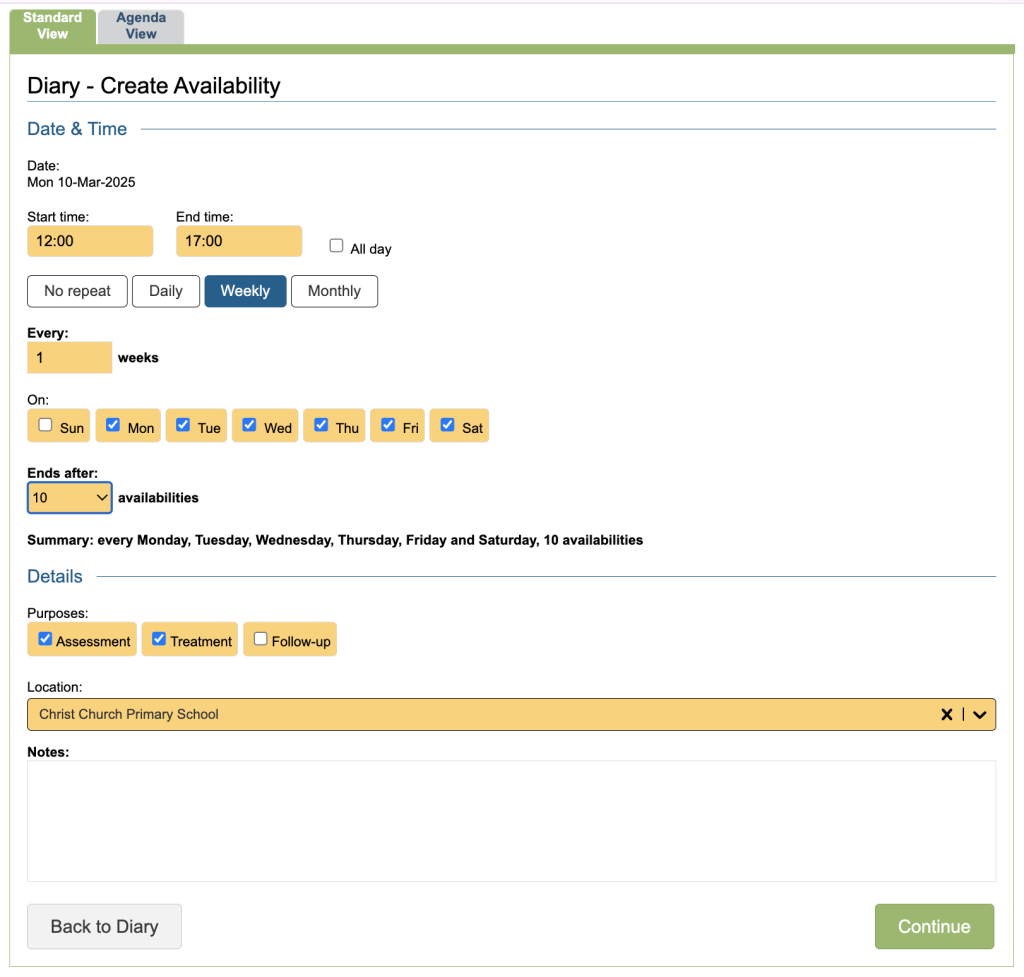
- The options to repeat the availability include Days, Weeks and Months and depending on the option chosen, different choices will show.
Having selected the Weekly option, the following dialogue box will show. This allows the user to choose the days of the week to have the availability over and so will allow you to exclude weekends. In the example, Monday through to Friday will have availability slots for the next 2 weeks (10 Availabilities)
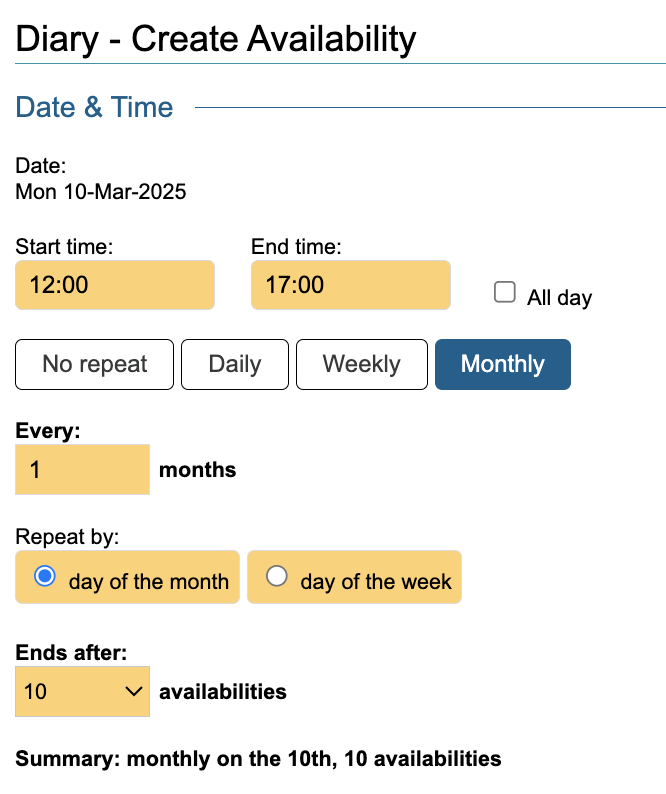
Having selected the Monthly option, the following dialogue box will show. This allows the user to choose the day of the Month, ie if the user had initially clicked on the 10th March the slots would be repeated on the 10th April, 10th May etc.
If the user chooses the day of the week, It will consider the day chosen and where if falls in the month eg the 10th March would be the second Monday so the slots would be for the second Monday of every month.

The number of availabilities works as above. Eg if the Day of the Month is chosen and then there were 5 availabilities selected, the slots would be created for the existing date and the same date for the following 4 months.
Once the all the availability fields have been completed and the Continue button has been pressed, a dialogue box with details of the availability slots that will be added to the diary but also if there are any slots which cannot be booked due to the diary having an existing entry.
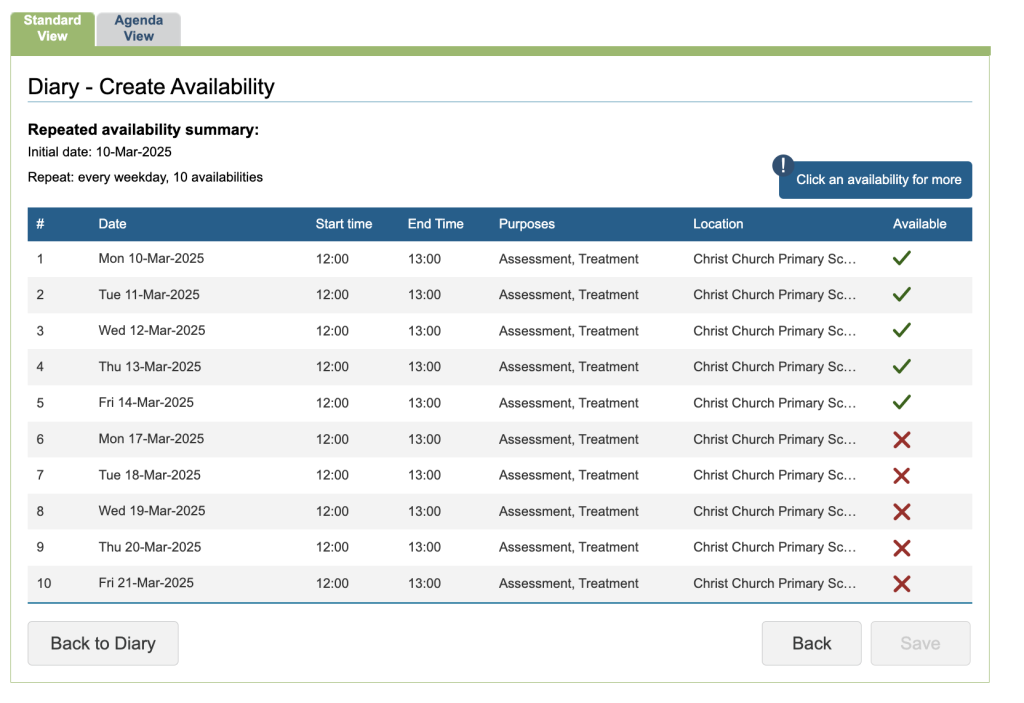
There are three options at this point and they include:
- Back to Diary – this will discard any availability slot(s) requested.
- Back – this will go back to the previous screen where the user can alter the details of the availability they wish to book.
- Edit individual slot with table – click anywhere within a row (this can be for rows containing both ‘X’ or tick)
To edit an entry, click on the row.
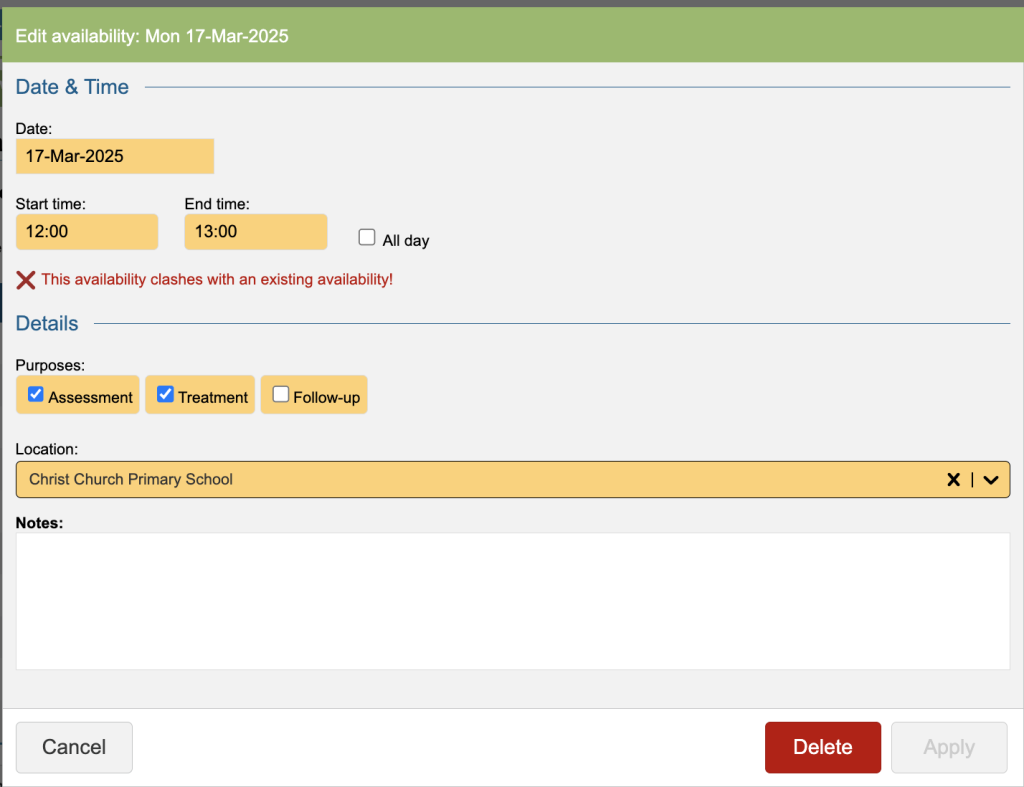
- Cancel this action
- Delete the specific availability slot
- Apply a change to the slot – if a slot is changed, that previously was marked as ‘X’, once the changes are applied, it will reappear in the previous table. If the change does not clash with an existing diary event, it will appear in the table with a tick instead of an ‘X’ etc.
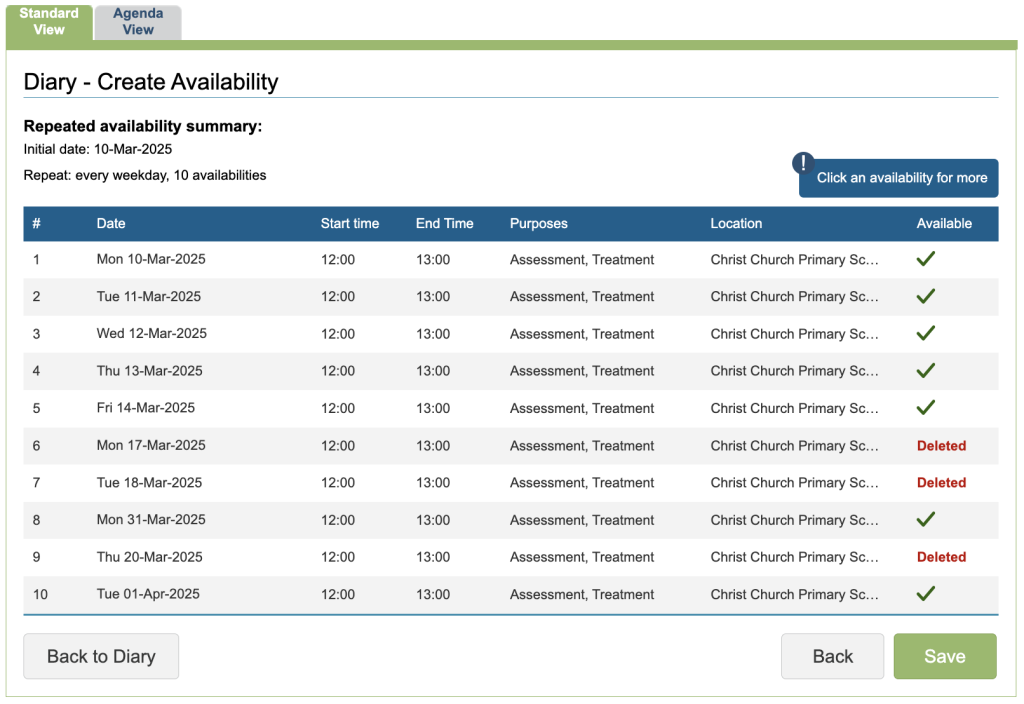
Once a user has either deleted or updated the slots so they now all have a tick, they can be Saved.
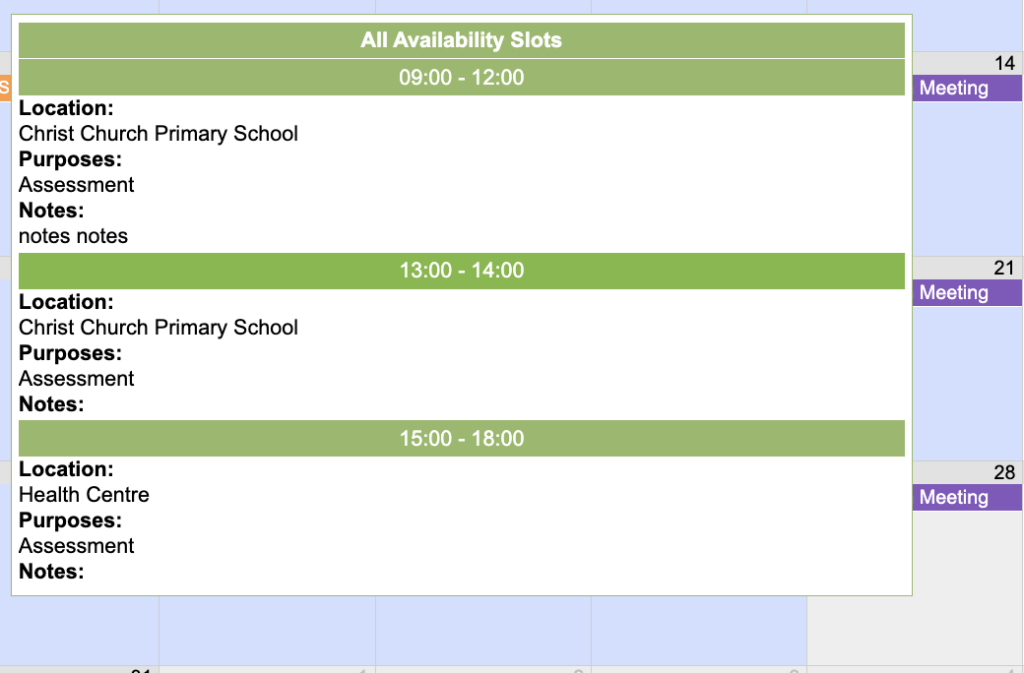
The diary would then update that day and it will appear in light blue, as stated in the key at the top. When you hover over a day with availability, a window will display detailing the slots for that day.
Editing Availability
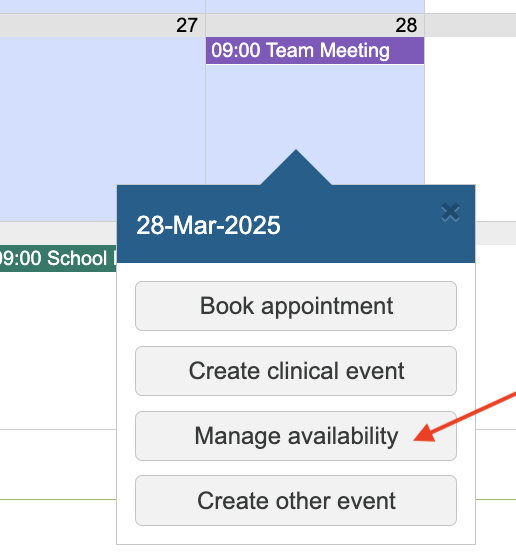
To update availability, Click on the required day, a popup will appear with the option to Manage availability.
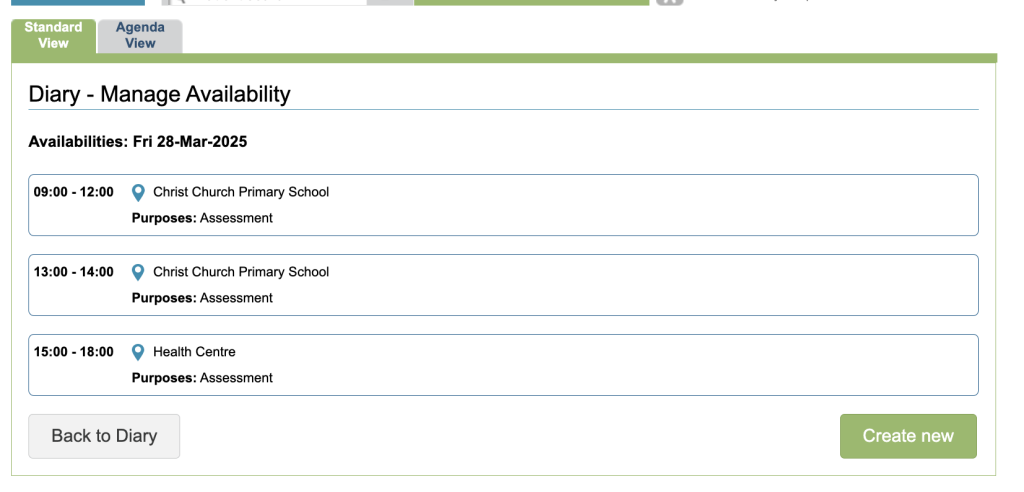
You will be presented with a list of slots for that day. You have the option either to edit the availability by clicking on it or there is an option to Create new.
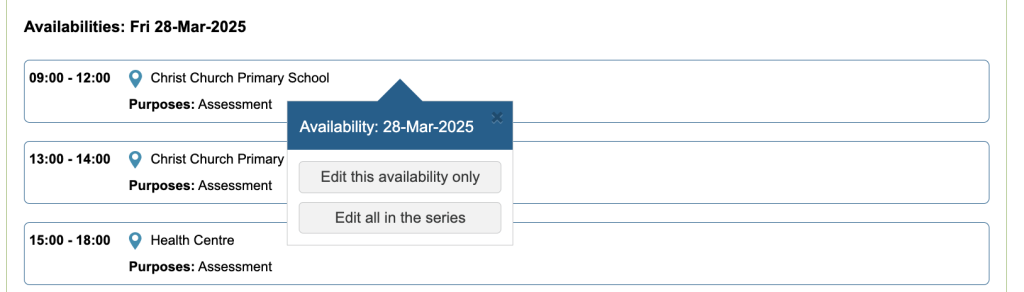
When you click on a slot you will have the option either to Edit the individual slot or to update all in the series.
If you edit the individual slot, you have the ability to update and save the changes or you can Delete it.
If you select all in the Series, you will be presented with a list of all the slots, where you can edit and individual one by clicking on it or delete the remaining ones.
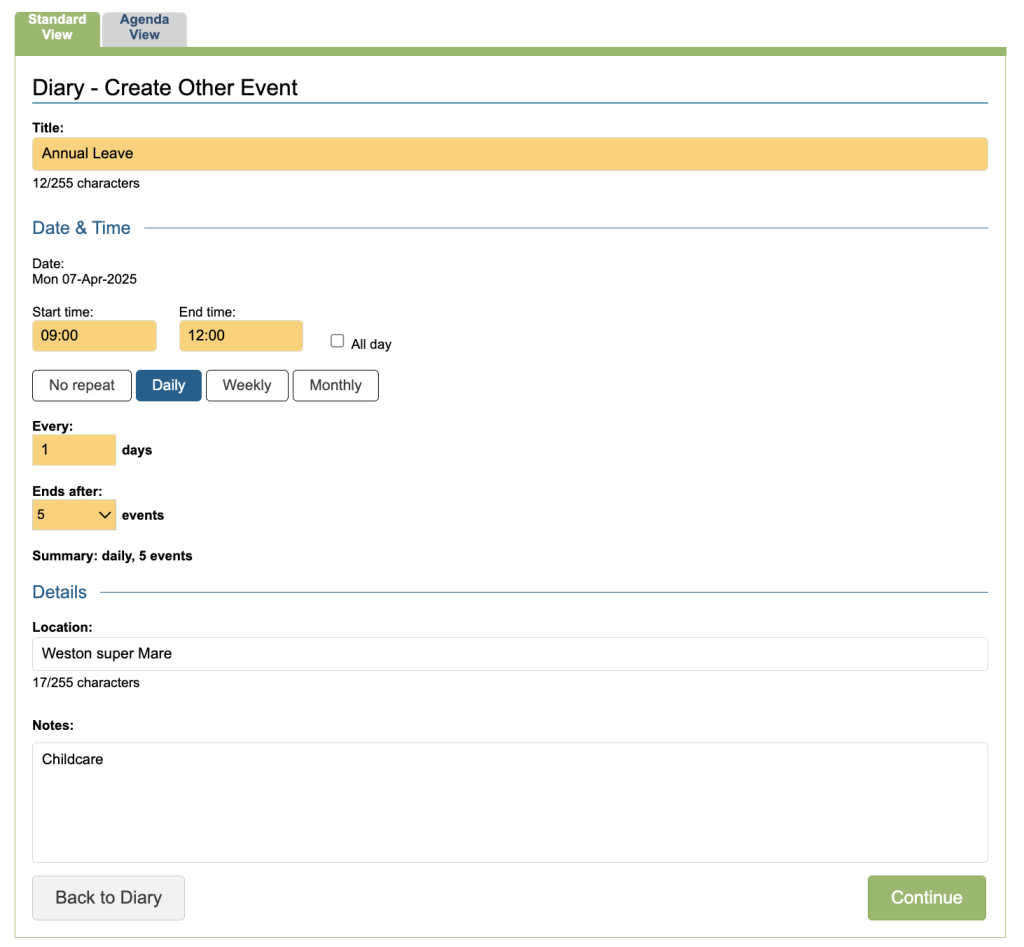
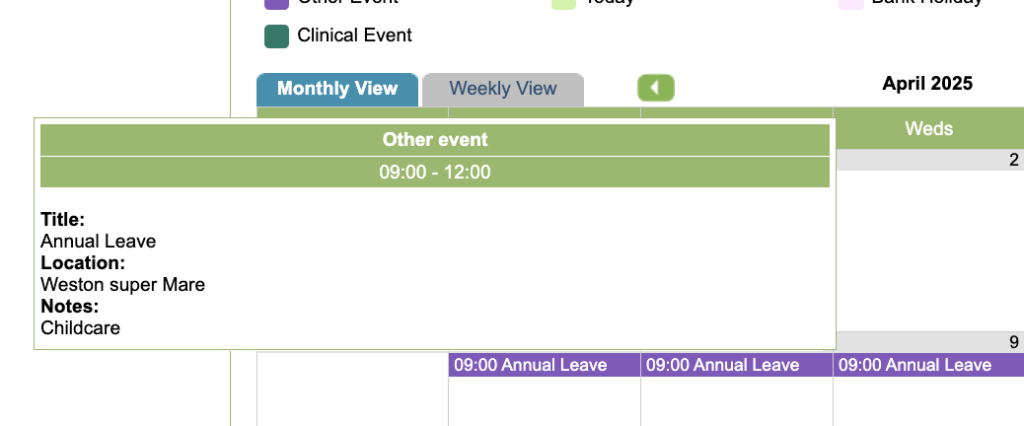
Adding Other Events
Non-patient events can also booked into the diary. These are categorised as Other Events and do not require availability to be allocated prior to booking.
You will be presented with the Create Other Event window, enter the required information and click on save.
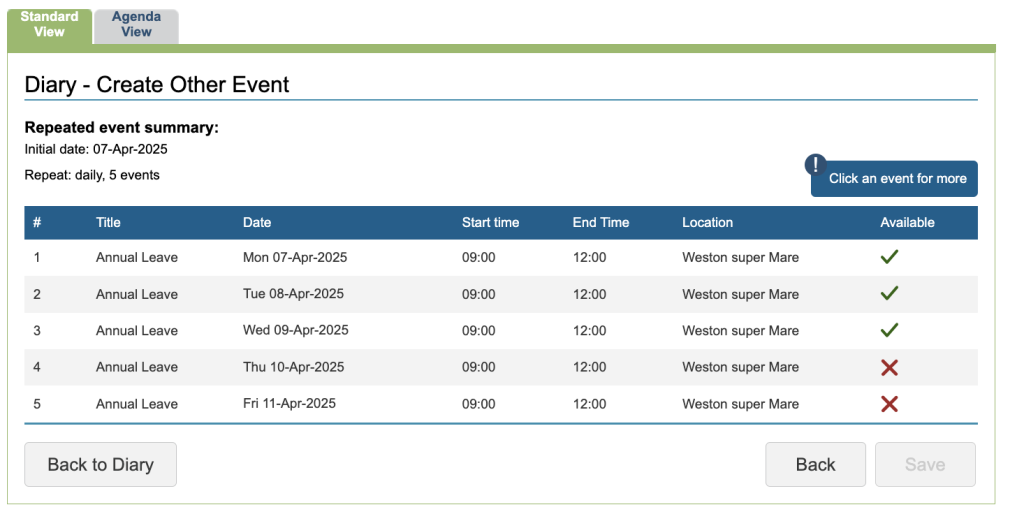
By clicking on the Continue button, a similar table to below will appear, showing if the the events can be booked
Once saved, the event will appear in the diary in purple, and you can hover to view more detail.
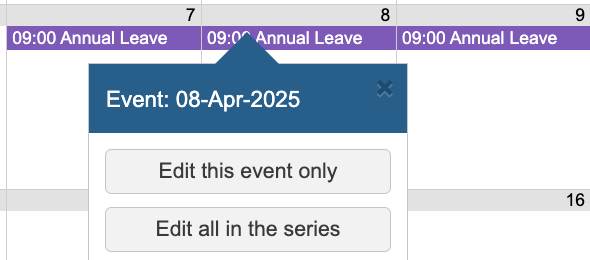
To edit or delete the personal event, simply click on its entry in the diary and choose to Edit just the Event on that day or the Events in the series.
Adding Clinical Events
Clinical events which do not relate to individuals registered within Iaptus can also be booked into the Diary. These are categorised as ‘Clinical Events’ and do not require availability to be allocated prior to booking.
If you are a CYP Service and need to collect information for the 301 report please refer to CYP Recording & Report on Clinical Events
To add a Clinical Event, simply click on the day you wish to add the Event for. This will bring up a pop-up. Click on the Clinical Event option.
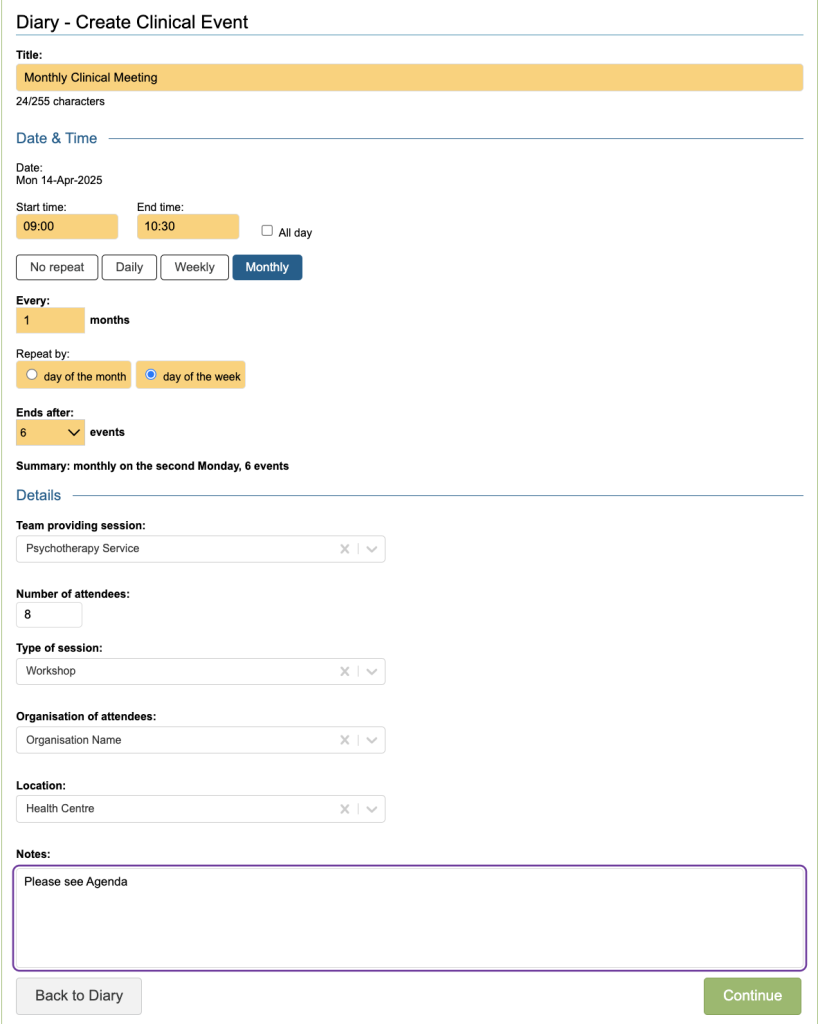
You will be presented with the new Clinical Event window, enter the details and select Continue or Save
If you have set it up to repeat you will be presented with the event summary, This has the same functionality as the availability slot table.
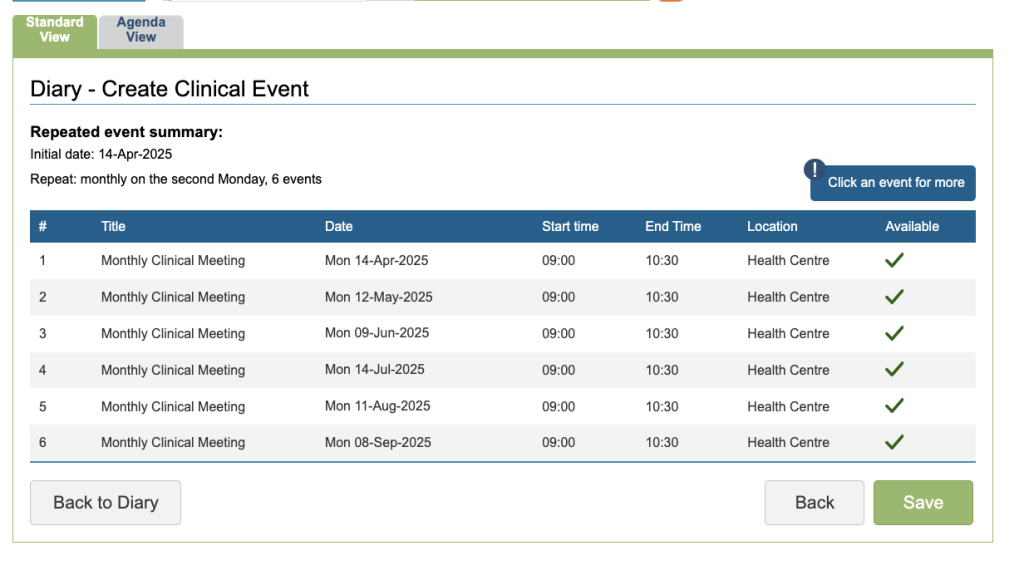
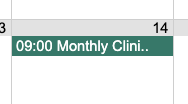
When you have added the Clinical Events to the Diary, you will see it indicated on the Diary as a dark green entry.
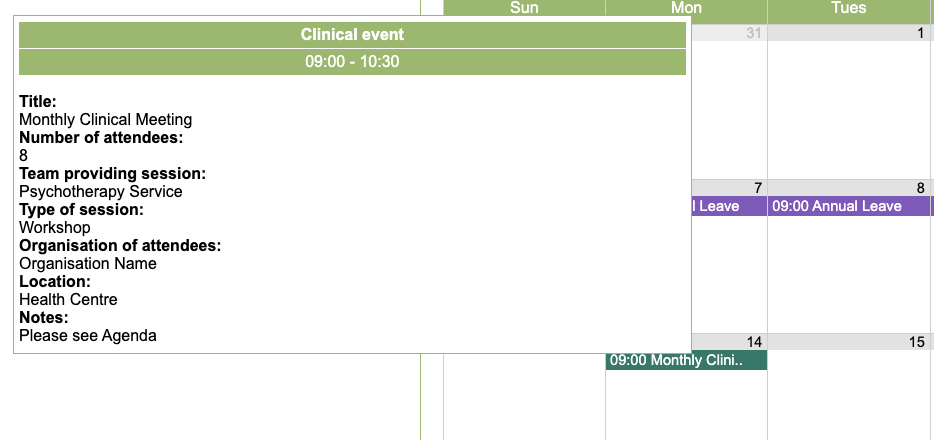
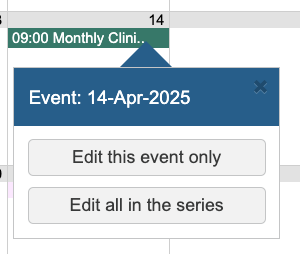
By hovering over it, you can see more detail and by clicking on the item, you will have the option to edit the specific Clinical Event or the series to which the slot belongs. The functionality now works in the same way as the availability slots.
To edit or delete the Clinical event, simply click on its entry in the diary and choose to Edit just the Clinical Event on that day or all the Clinical Events in the series.
You will be able to see Clinical event entries in the Agenda view where you can also view Events and Patient Appointments.
Booking appointments
When in the Diary, Goto the required date, Right click, you will be presented with the menu, where you can select the Book appointment option.

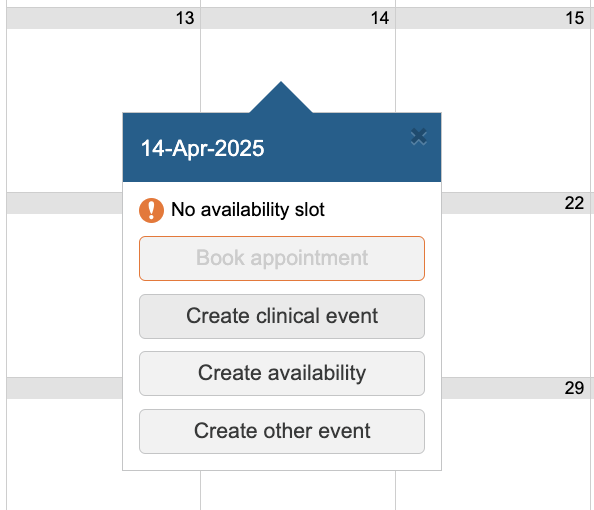
There must be an availability slot available otherwise the Book Appointment option will not be active and a message will be displayed advising that there is no availability slot.
A patient must also be loaded in the Green loaded patient area at the top, again, if there isn’t a loaded patient, you will be advised that a patient has not been selected, or the patient does not have an episode.
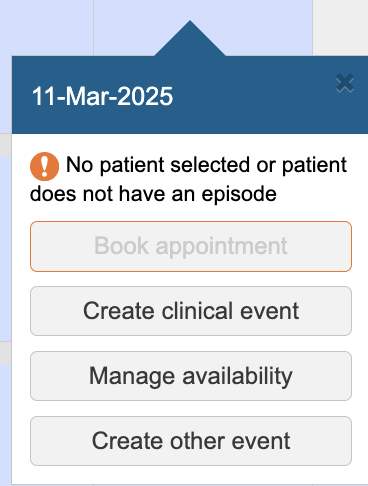

Therefore, please check that you have the correct patient loaded as the appointment you add here will be for that patient.
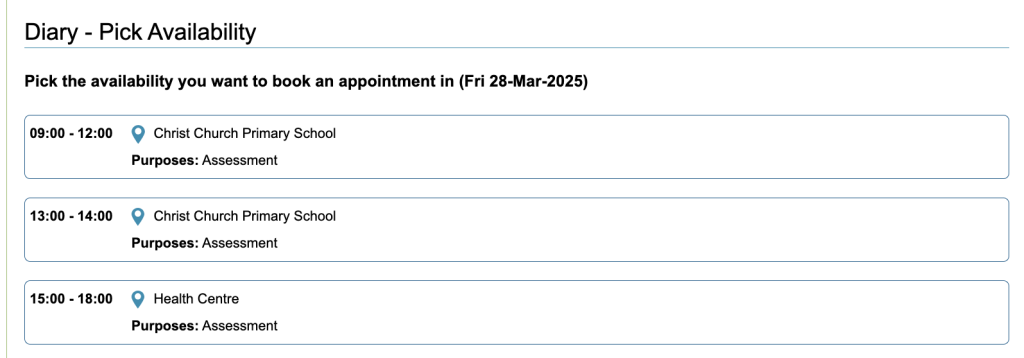
Once the Book Appointment has been selected you will be presented with a list of availability slots. Select the required slot.
You will be presented with the Create Appointment window, Please note the heading for the appointment displays the Patients Name as confirmation.
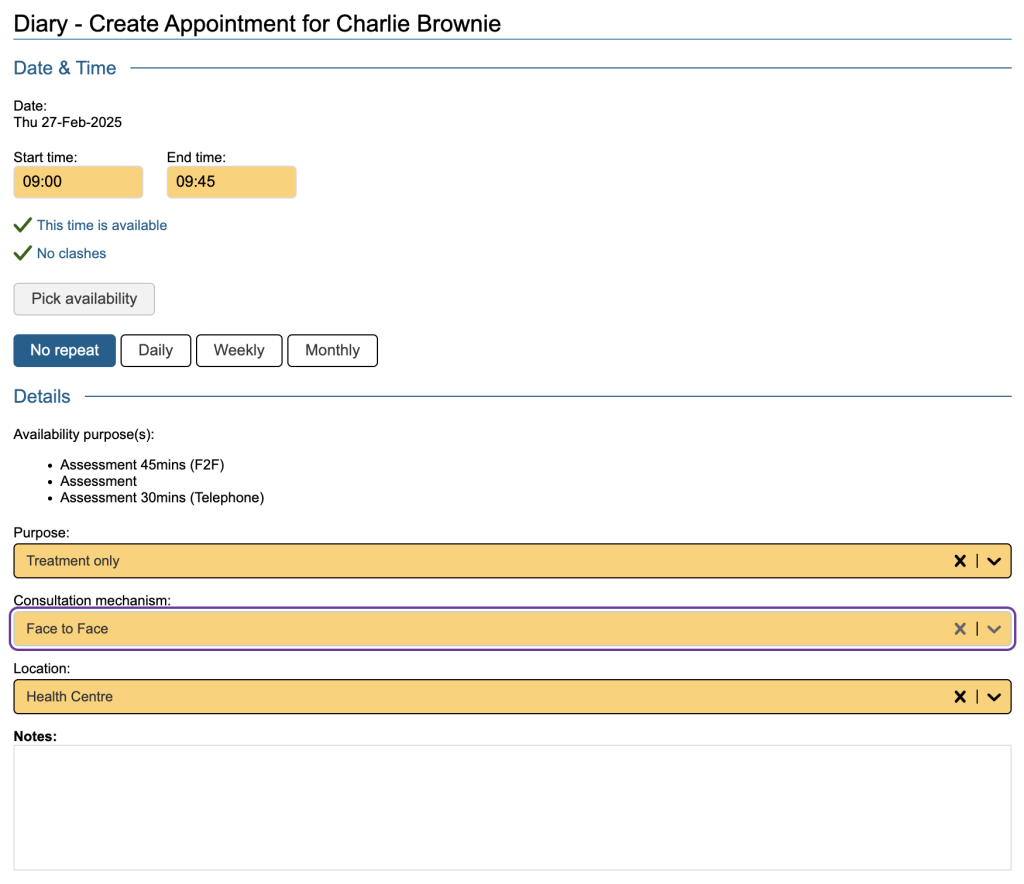
Appointment Details
Please complete the required information:
- The start and end times of that the appointment
- The availability in relation to Daily, Weekly and Monthly
- The appointment purpose (i.e. assessment, treatment)
- The Consultation medium and Location
- Any notes. These will appear in the clinical contact for the appointment
- The option to allocate/re-allocate the patient to the therapist whose diary they are being booked in for.
- Orange fields are mandatory.
- The Daily, Weekly and Monthly options work in the same way as for multiple availability slots (See Adding availability)
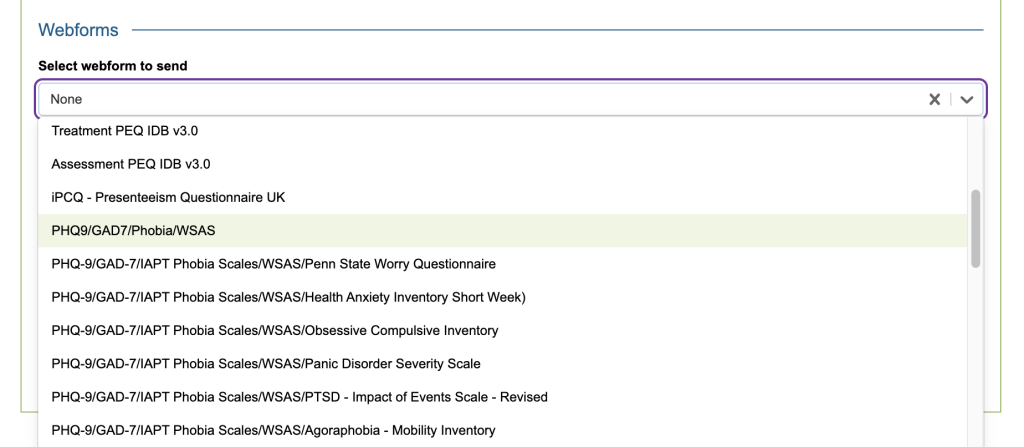
Webforms / online Questionnaires
If webforms are enabled for your service and your patient, you can select here which combination to send.
SMS Reminder
If selected, automatic SMS appointment reminders will also be generated when the appointment is saved.

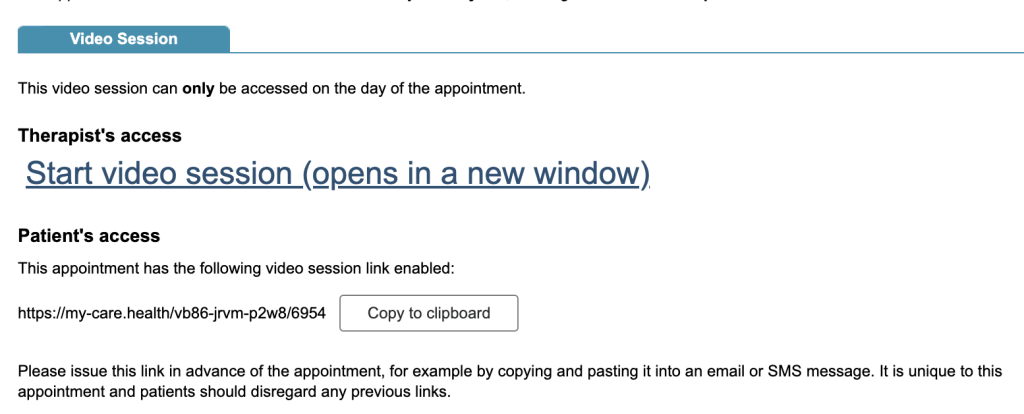
Video Session
If selected and you have this feature enabled, a video link for the session will be generated

Superuser Settings
Many of these field values can be customised by superusers in the superuser menu
- The appointment start and end time via the control panel diary area
- The purpose via the list management area
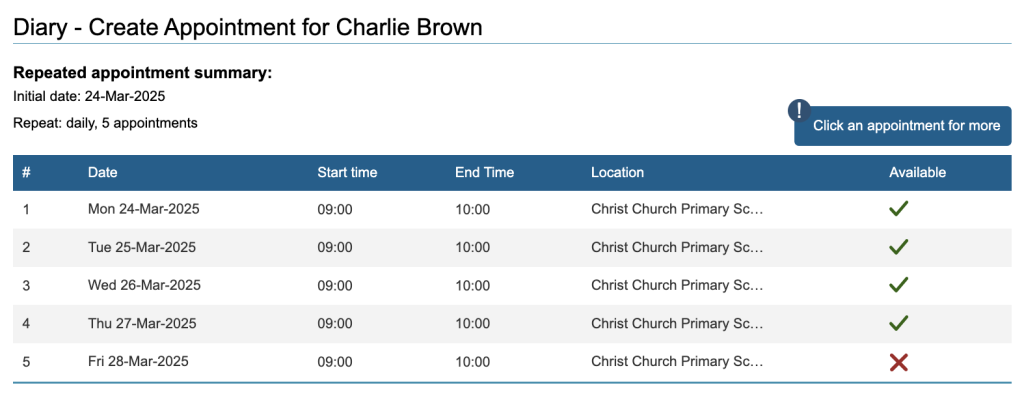
Once the appointment details have been saved, a table will show indicating if the appointments can be booked or if they need to be reviewed (shown as an ‘X’)
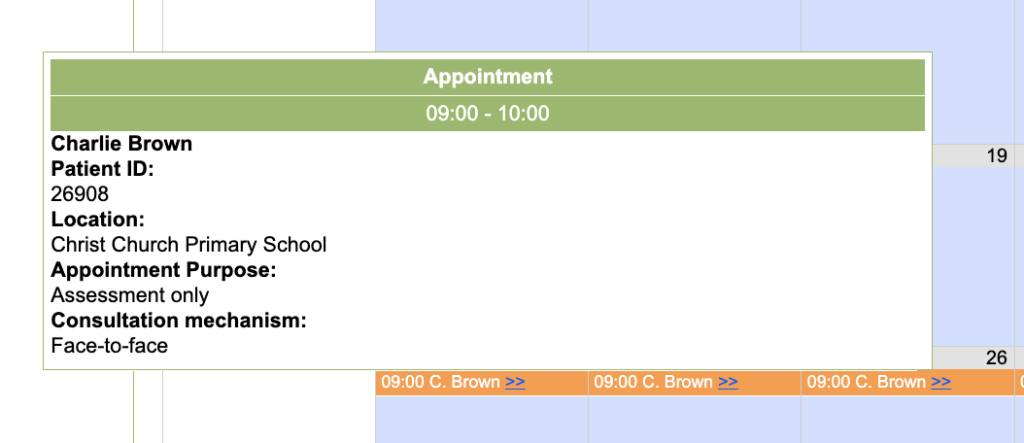
Once the appointment(s) has been saved successfully, the appointment will appear in orange. You can also hover over the appointment to find more information about it.
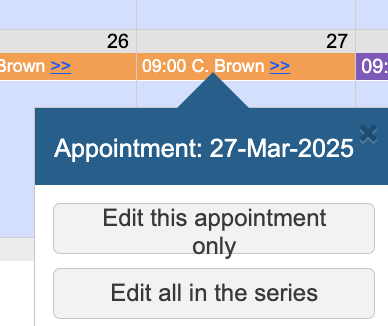
To edit or delete the patient appointment, simply click on the entry and select to just Edit the current appointment or all appointments in the series. If automatic SMS cancellation messages are set up, deleting the appointment will generate a message.
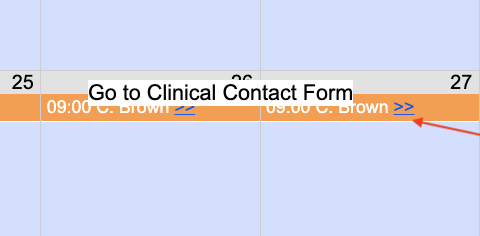
To quickly view the clinical contact for an appointment, click on the >> symbol next to the appointment entry.
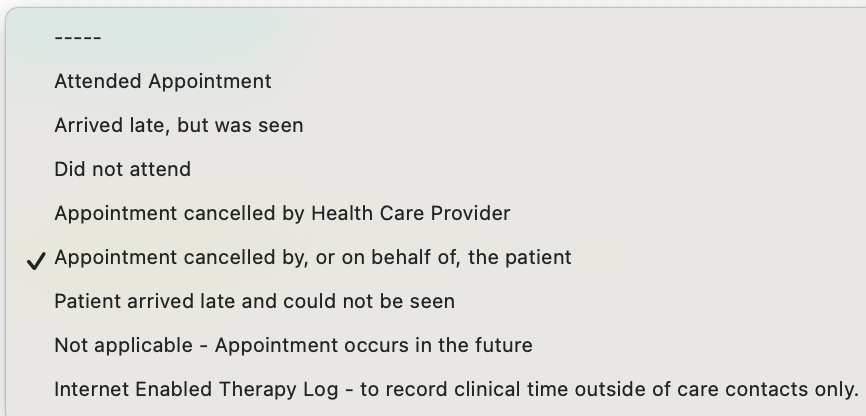
Attended, Cancelled or Did Not Attend Appointments
When you update an appointments attendance, this will be reflected in the diary to the right of the appointment in brackets. (C) – Cancelled, (L) – Late, (A) – Attended, (DNA) – Did not attend.